The Overland Expo in Asheville last year was a great event, and one of my favorite sessions covered the basics about radio communications while overlanding. The instructors shared their radios with us and taught us some tips and tricks for how to save power and communicate effectively on the trail.
Back at the office, I was surprised to discover how many of my coworkers had an FCC license already. They gave me tips on getting started and how to learn the material for the exam. I took some of my questions to Twitter and had plenty of help pouring in quickly.
This post covers how I studied, what the exam was like, and what I’ve learned after getting on the air.
The basics
FCC licenses in the US for amateur radio operators have multiple levels. Everything starts with the Technician level and you get the most basic access to radio frequencies. From there, you can upgrade (with another exam) to General, and Extra. Each license upgrade opens up more frequencies and privileges.
Studying
A coworker recommended the official ARRL book for the Technician exam and I picked up a paper copy. The content is extremely dry. It was difficult to remain focused for long periods.
The entire exam is available in the public domain, so you can actually go straight to the questions that you’ll see on the exam and study those. I flipped to the question section in the ARRL book and found the questions I could answer easily (mostly about circuits and electrical parts). For each one that was new or difficult, I flipped back in the ARRL book to the discussion in each chapter and learned the material.
I also used HamStudy.org to quickly practice and keep track of my progress. The site has some handy graphs that show you how many questions you’ve seen and what your knowledge level of different topics really is. I kept working through questions on the site until I was regularly getting 90% or higher on the practice tests.
Testing
Before you test, be sure to get a FCC Registration Number (commonly called a FRN). They are free to get and it ensures that you get your license (often called your ’ticket’) as soon as possible. I was told that some examiners won’t offer you a test if you don’t have your FRN already.
The next step is to find an amateur radio exam in your area. Exams are available in the San Antonio area every weekend and they are held by different groups. I took mine with the Radio Operators of South Texas and the examiners were great! Some examiners require you to check in with them so they know you are coming to test, but it’s a good idea to do this anyway. Ask how they want to be paid (cash, check, etc), too.
Be sure to take a couple of pencils, a basic calculator, your government issued ID, your payment, and your FRN to the exam. I forgot the calculator but the examiners had a few extras. The examiners complete some paperwork before your exam, and you select one of the available test versions. Each test contains a randomly selected set of 35 questions from the pool of 350.
Go through the test, carefully read each question, and fill in the answer sheet. Three examiners will grade it when you turn it in, and they will fill out your Certificate of Successful Completion of Examination (CSCE). Hold onto this paper just in case something happens with your FCC paperwork.
The examiners will send your paperwork to the FCC and you should receive a license within two weeks. Mine took about 11-12 business days, but I took it just before Thanksgiving. The FCC will send you a generic email stating that there is a new license available and you can download it directly from the FCC’s website.
Lessons learned on the air
Once I passed the exam and keyed up for the first transmission, I feared a procedural misstep more than anything. What if I say my callsign incorrectly? What if I’m transmitting at a power level that is too high? What power level is too high? What am I doing?!
Everyone has to start somewhere and you’re going to make mistakes. Almost 99.9% of my radio contacts so far have been friendly, forgiving, and patient. I’ve learned a lot from listening to other people and from the feedback I get from radio contacts. Nobody will yell at you for using a repeater when simplex should work. Nobody will yell at you if you blast a repeater with 50 watts when 5 would be fine.
I’m on VHF most often and I’ve found many local repeaters on RepeaterBook. Most of the repeaters in the San Antonio area are busiest during commute times (morning and afternoon) as well as lunchtime. I’ve announced my callsign when the repeater has been quiet for a while and often another radio operator will call back. It’s a good idea to mention that you’re new to amateur radio since that will make it easier for others to accept your mistakes and provide feedback.
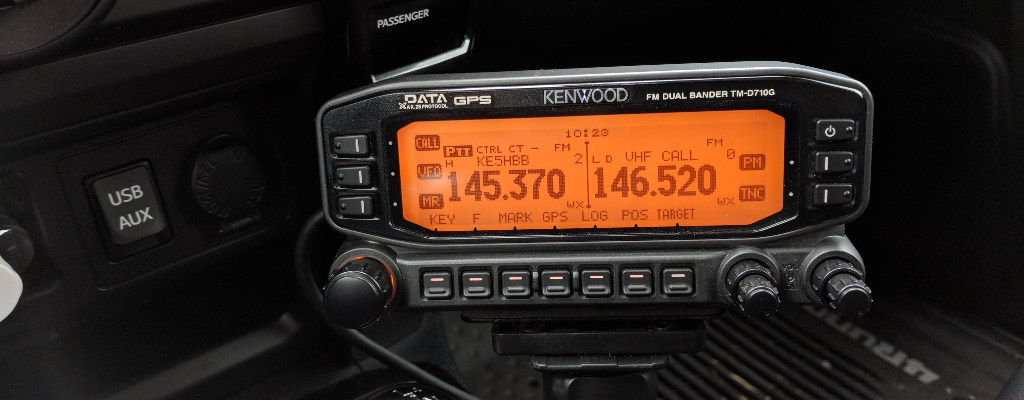
when I’m traveling long distances, I monitor the national simplex calling frequency (146.520). That’s the CB equivalent of channel 19 where you can announce yourself and have conversations. In busy urban areas, it’s best to work out another frequency with your contact to keep the calling frequency clear.
My equipment
My first purchase was a (cheap) BTECH UV-5X3. The price is fantastic, but the interface is rough to use. Editing saved channels is nearly impossible and navigating the menus requires a good manual to decipher the options. The manual that comes with it is surprisingly brief. There are some helpful how-to guides from other radio operators on various blogs that can help.
I picked up a Kenwood TM-D710G mobile radio from a coworker and mounted it in the car. I wired it up with Anderson Powerpole connectors and that makes things incredibly easy (and portable). The interface on the Kenwood is light years ahead of the BTECH, but the price is 10x more.
My car has the Comet SBB-5NMO antenna mounted with a Comet CP-5NMO lip mount. It fits well on the rear of the 4Runner.
Managing a lot of repeater frequencies is challenging with both radios (exponentially more so with the BTECH), but the open source CHIRP software works well. I installed it on my Fedora laptop and could manage both radios easily. The BTECH radio requires you to download the entire current configuration, edit it, and upload it to the radio. The Kenwood allows you to make adjustments to the radio in real time (which is excellent for testing).
More questions?
If you have more questions about any part of the process, let me know!