 Diagram: OpenVPN to Rackspace Cloud Servers and Slicehost
A recent blog post from Mixpanel inspired me to write a quick how-to for Fedora users on using OpenVPN to talk to instances privately in the Rackspace Cloud.
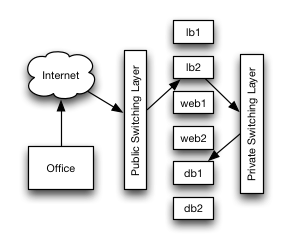
The diagram at the right gives an idea of what this guide will allow you to accomplish. Consider a situation where you want to talk to the MySQL installation on db1 directly without requiring extra ssh tunnels or MySQL over SSL via the public network. If you tunnel into one of your instances, you can utilize the private network to talk between your instances very easily.
There’s one important thing to keep in mind here: even though you’ll be utilizing the private network between your tunnel endpoint and your other instances, your traffic will still traverse the public network. That means that the instance with your tunnel endpoint will still get billed for the traffic flowing through your tunnel.
You’ll only need the openvpn package on the server side:
yum -y install openvpn
Throw down this simple configuration file into /etc/openvpn/server.conf:
port 1194
proto tcp
dev tun
persist-key
persist-tun

server 10.66.66.0 255.255.255.0
ifconfig-pool-persist ipp.txt

#push "route 10.0.0.0 255.0.0.0"
push "route 10.176.0.0 255.248.0.0"
keepalive 10 120

ca      /etc/openvpn/my_certificate_authority.pem
cert    /home/major/vpn_server_cert.pem
key     /home/major/vpn_server_key.pem
dh      /etc/openvpn/easy-rsa/2.0/keys/dh1024.pem

status log/openvpn-status.log
verb 3
Here’s a bit of explanation for some things you may want to configure:
push: These are the routes that will be sent over the VPN that are pushed to the clients. If you don’t use any IP addresses in the 10.0.0.0/8 network block in your office, you can probably use the commented out line above. However, you may want to be more specific with the routes if you happen to use any 10.0.0.0/8 space in your office.server: These are the IP addresses that the VPN server will assign and NAT out through the private interface. I’ve used a /24 above, but you may want to adjust the netmask if you have a lot of users making tunnels to your VPN endpoint.ca, cert, key: You will need to create a certificate authority as well as a certificate/key pair for your VPN endpoint. I already use SimpleAuthority on my Mac to manage some other CA’s and certificates, but you can use openvpn’s easy-rsa scripts if you wish. They are already included with the openvpn installation.
Build your Diffie-Hellman parameters file:
cd /etc/openvpn/easy-rsa/2.0/ && ./build-dh
Tell iptables that you want to NAT your VPN endpoint traffic out to all 10.x.x.x IP addresses on the private network:
iptables -t nat -A POSTROUTING -s 10.0.0.0/8 -o eth1 -j MASQUERADE
The last step on the server side is to ensure that the kernel will forward packets from the VPN endpoint out through the private interface. Ensure that your /etc/sysctl.conf looks like this:
# Controls IP packet forwarding
net.ipv4.ip_forward = 1
Adjusting your sysctl.conf ensures that forwarding is enabled at boot time, but you’ll need to enable it on your VPN endpoint right now:
echo 1 > /proc/sys/net/ipv4/ip_forward
Start the openvpn server:
/etc/init.d/openvpn start
If all is well, you should see openvpn listening on port 1194:
[root@lb2 ~]# netstat -ntlp | grep openvpn
tcp        0      0 0.0.0.0:1194      0.0.0.0:*         LISTEN      2020/openvpn
You’ll need to configure a client to talk to your VPN now. This involves three steps: creating a new certificate/key pair for the client (same procedure as making your server certificates), signing the client’s certificate with your CA certificate (same one that you used above to sign your server certificates), and then configuring your client application to access the VPN.
There are many openvpn clients out there to choose from.
If you’re using a Linux desktop, you may want to consider using the built-in VPN functionality in NetworkManager. For Mac users, I’d highly recommend using Viscosity ($9), but there’s also tunnelblick (free).